
Week One
There are 3 groups participating in the Tell Your Story framework, each week I'll keep you up-to date with the exercises that we've done so that you can try them at home. I'm the tutor, Karen Alderson.
The TYS (Tell Your Story) course aims to introduce participants to creative writing & book-making so that by the end of the course each group will have made a book together. We have two groups who are running with 12 sessions, these are based in Burnley and Clitheroe and one group with 6 sessions that is also based in Burnley. If you would like to join then please contact the Ace Centre, Nelson & ask for Kirsty Rose.
In our first session we discussed how sometimes it can be difficult to "get going"with writing or creative activities. Like anything else we need to get into a mind set and writers and creatives usually have a routine, a ritual or activity that warms them up and shifts them into a more creative frame of mind. Some creatives go for a walk, some meditate, do physical exercises, wear their creative clothes, have a special time of day or a special place where they do their creative work. This is the beginning of the creative process and it needs to be separate from our normal everyday activity. Check out the book "The Artist Way" by Julia Cameron or "The Right to Write" by the same author for more ideas.
So, to relax us we did some gentle exercise, warming up each part of the body, learning good posture and doing some breathing exercises. Once we were relaxed we began our first writing exercise.
Exercise 1:
Get a piece of paper, fold it in half, and on the left hand side of the paper number 1-5 down one side. On the right hand side of the fold number 1-5 down that bit of the paper.
On the left hand side write 5 words that describe how you feel right now, this could be physically, mentally, emotionally, spiritually, how you feel about doing the exercise.
Next look around the room that you are in, try and see every little object in that room. Now on the right hand side of the fold write 5 objects that you have seen.
Open the paper, you should have 5 phrases linking feeling words with objects: Here's some examples the groups came up with: secretive skirting board, confident shopping bag, tired window.
From here write 5 sentences with each of your phrases. Here's some of ours:
The stressed whiteboard spoke of things she couldn't understand.
The confident shopping bag held her life together.
Next decide which of the phrases would make a good beginning and a good end to a short story.
The last bit is to write a beginning sentence at the top of a piece of A4 and an end sentence at the bottom of the paper. Now all you have to do is to fill in the space between the two sentences and you have a short story.
In our groups we had a good discussion about what makes a good beginning and a good end, many sentences can be both.
Hope that you enjoyed the exercise as much as we did.
Week Two
Exercise 2
Using magazines chose 5 images. Any images you want.
Next put those images in sequence, i.e. which would come first, second etc. What you are doing is creating a narrative or a story from 5 random images. We can do this as it is a human trait whereby we create meaning from objects.
Once you have created a story, tell it to someone else or write it down.
Next, chose a character from your story and then imagine an object that they just cannot live without. It has to be an object e.g a pen, or a mobile etc.
Now, write down as many words or associations with the object that you can think of.
E.g. for pen we had: expression, secrecy, planning, communication, doodling, ink, calligraphy, lists, identity, freedom, diary, handwriting.
The last bit is to write the following sentence at the top of a piece of paper:
"The day my life changed was.....". Now write a short piece by your main character from your story using all the words that you have listed for your object.
Have fun!
Week Three
In our third session we began our warm up by describing our week as if it were an animal and then putting three words with it. Then we went straight into free writing using a different type of music from last week. We spoke about how we found free writing, some participants were really enjoying it, others were still perplexed as to what to do. Remember, free writing is just about warming you up into a creative frame of mind. It doesn't matter what you write.
To extend this we tried different types of music. I asked participants to write words that came immediately into their minds as the music played. From here papers were passed onto the next person & the next person who circled a few words each. These words were then listed and I gave each person 8 words each and asked them to make two sentences from the words. Then we shared the sentences and made a group poem.
Our next warm up activity was to make stories by saying one word each as we went round all the participants, we had some very surreal stories. We extended this by asking participants to work in pairs and again, just saying one word each, they had to make a story between them. This was great fun.
Exercise 3: Try this at home
We looked at what stories contained: themes, settings, characters, plots, a twist, descriptions.
Now list possible themes: we came up with betrayal, loss, love, revenge, tragedy, transformation, liberation, humour, crime.
Choose your theme. We decided on revenge.
Think about a setting, if you are stuck then go through a magazine and see if there are any pictures or photographs that give you ideas. Here's some of ours: palace, church, school, asylum, a sleepy village, town, dark shopping centre, historical, work place. Or you could chose a real town.
Now, using a magazine choose 3 people, cut them out and for each of them imagine that you are interviewing them about their life history. Find out everything about them and either record it if you have a computer or dictaphone or write it down. If you get stuck, look in the Saturday's Guardian Magazine. They interview someone each week with a list of questions. Try thinking about, how old they are, where they live, who they live with, what motivates them, have they got any family, what is their house like. This is called a character analysis.
In pairs we imagined that we knew the character really well and each of us took it in turn to interview the other about the character. It was astounding how much our mind could imagine from just one photograph!
The next stage is to put your three characters on a large sheet of paper with your theme and your setting and imagine how your characters could be connected, and, how their meeting and relationships play out the theme that you have chosen. If possible, try this out with a few friends and see what ideas are shared.
Once you have some ideas, write them down: this is your plot. Now all you have to do is to start writing the story that you have created. Don't worry about what others will think of it, just get the story down on paper or on the computer. You'll be able to edit it later. Remember, do not correct it now-that bit comes a lot later.
Hope that you like the exercises!
Week Four
In this weeks session we focussed on clothing, fabric and cloth.
For our first writing exercise we thought about an item of clothing that we have loved or hated in our lives. I asked the students to describe the piece of clothing, the situation that gave rise to their love or hatred of it and how that experience had affected how they related to clothes in the present. We then shared our writing and what recollections there were!
Our second exercise involved choosing a piece of fabric from a selection that I had brought in from my fabric store. I asked the students to sit with the chosen piece of fabric and imagine where it would have come from, who may have worn it or touched it, any stories that they thought were attached to it or any memories that were triggered by it.
This exercise gave rise to some unexpected memories and startling stories.
Our third exercise made use of my button collection. Each student was asked to choose three buttons, the first to represent where they were now, a second to represent them in the past and a third to represent their future. They had to write about this then share with the group.
The last exercise was to choose a three buttons for the person on your right, give them to the person and explain why they had chosen them. We then shared this and said how it felt to choose the buttons for someone else and how it felt to receive them.
Week Five
Our theme this week was characters.
I have a bag of photos of people that I have collected from magazines then laminated.
From this collection each student chose 1 person. I then gave the students a list of interview questions and to get into pairs. One student in the pair had to interview the other student and pretend that they knew the person in the photograph that they had chosen.
They had to find out as much as they could about the character and write this information down. This involved imagining the character's name, address, age, education, family status, marital status, sexuality, who they lived with, what their house was like, what was their favourite foods, any idiosyncratic gestures, their employment, their hopes & dreams, fears, motivations, hobbies, pets, their past relationships with family, partners, friends, state of their health, offspring etc. We also used the questionnaire that appears in the Saturday Guardian magazine to help develop our characters. It is good to know as much as you can about your character, even if you do not actually write about it in the story, it gives depth to your character. It is also useful to draw a time line of their life to figure out what events happened to them.
Later in the session we discussed themes for stories, things like betrayal, revenge, power, love, tragedy, class, transformation. Then we chose a theme for our story.
Then we looked at settings for stories: we came up with lots, here's a few: outer space, rural places-wild open spaces, urban-inner city, suburbs, liminal spaces lie airports, bus stations, police stations, tube stations, home, school, boarding schools, courts,work, pub, nightclub, rivers, sea, mountains, fantasy places, gothic landscapes. We chose our setting.
Week Six
This week we started to develop the plot for the book.
We began with the characters we had created last week and wondered how they could meet. What are their unconscious motivations? What was it about each character that drove them to do what they did in their lives? What incident would bring our characters together to provide friction and drama?What would develop or challenge our characters? What situation would cause them to feel uncomfortable?
This led to lots of ideas for our story. Remember, the aim of our course is to create a book that is based on the group's ideas and so we have to collaborate and communicate our ideas together. In this collaborative process, many ideas develop as a result of sharing ideas-its magical to observe the ideas developing as we talk. Try this at home with a few friends and see what stories you can make up with a few imaginary characters.
Week Seven
Last week we started to outline the beginnings of the plot, we recapped on the plot for those students who were absent the previous week. Recapping is a useful process, it helps to clarify and highlight any weak areas in the plot. We discussed further how the characters may react to one another and how we could move the story on. As a result, we managed to write 8 scenes and feel confident about the structure of the story. Each students had to take a scene and fleshed it out as homework.Week Seven
Now it was time to start concentrating on the artwork for the book. However, just like writing we needed to “warm up” for our creativity. We did this by rolling out large sheets of lining paper onto the tables. Then we engaged in various expressive drawing exercises for example, making large doodles and creating marks in relation to various emotional states. For example, we made marks that may connote happiness, irritation, sadness, anger, guilt. This is a great activity to do with children (as well as adults!), other drawing warm up activities include drawing things with your eyes closed, drawing with your non-dominant hand, drawing by keeping the drawing implement on the paper, drawing in response to music.
Remember there are no wrong ways to do this sort of drawing. The fun is in just doing it and enjoying the process. Don’t forget to try different drawing media like oil pastels, chalk pastels, felt tips, sticks dipped in drawing ink.


Once we had loosened up we began by thinking about the settings within which we had placed our characters and the colours that could be associated with them. I then showed the students how to add colour to white fabric with the use of a scraper. This involves squirting three colours onto the fabric then scraping them across the material so that they blend together. We all had great fun trying this out.
Week Eight
This week we continued to concentrate on the artwork for the book. We took the backgrounds that we had made the week before and then considered what sort of images we could put onto them to denote the various stage in the story. Once decided I then showed students how to make stencils using funky foam. To do this draw your image onto paper, cut it out, draw around the shape on your funky foam then cut it out. Once you have your image you can then use a print brayer (a small roller) to roll paint onto the back of it then press it onto your background wherever you want your image to be.
You can purchase A4 sheets (or larger)of funky foam online or at places that sell craft equipment like The Range. I use Daler Rowley Printing Block paint for the printing, you can also use acrylic paint, if its stiff, put a tiny amount of washing up liquid in it to make it smoother.
Here are some pictures of how ours turned out.


Week Nine
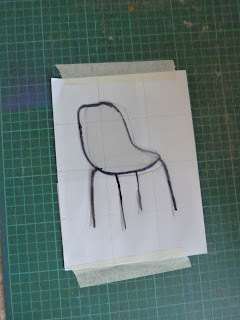
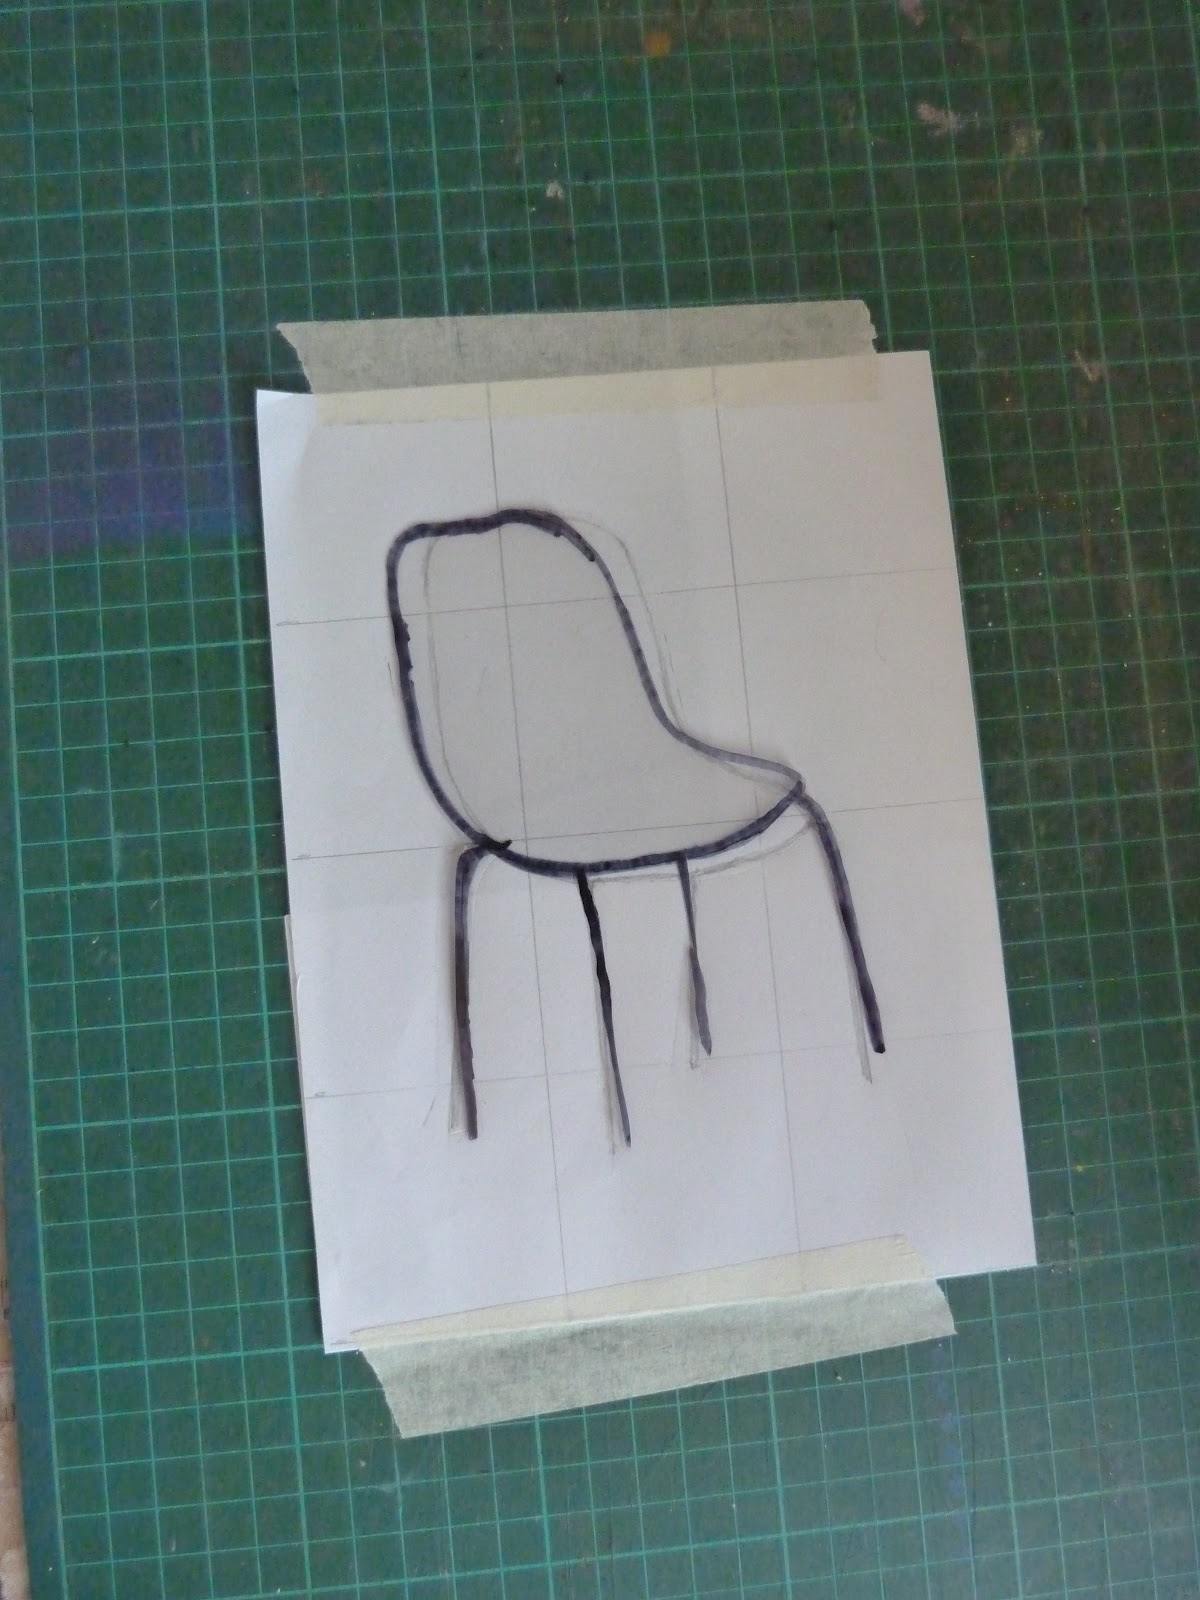
This week we continued with our artwork for the book and learn how to make stencils using acetate. Firstly we chose the image we wanted to include, (we initially researched the internet to find images). It is important to get the correct size of image for maximum impact. You can do this by enlarging images on the photocopier, on the computer or drawing them bigger. I showed students how to enlarge using the grid method and drawing.
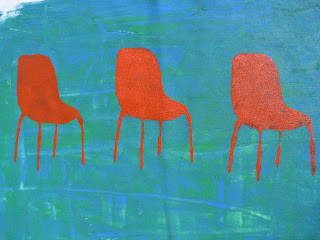
 Once they had enlarged their chosen images we then placed a sheet of acetate down on top of the image and then cut out the image with a scalpel. Once we had the acetate stencil we could place it on top of one of the backgrounds and sponge paint onto it.


Here’s one we made, it looks fantastic. Barbara was amazed at how well it turned out!

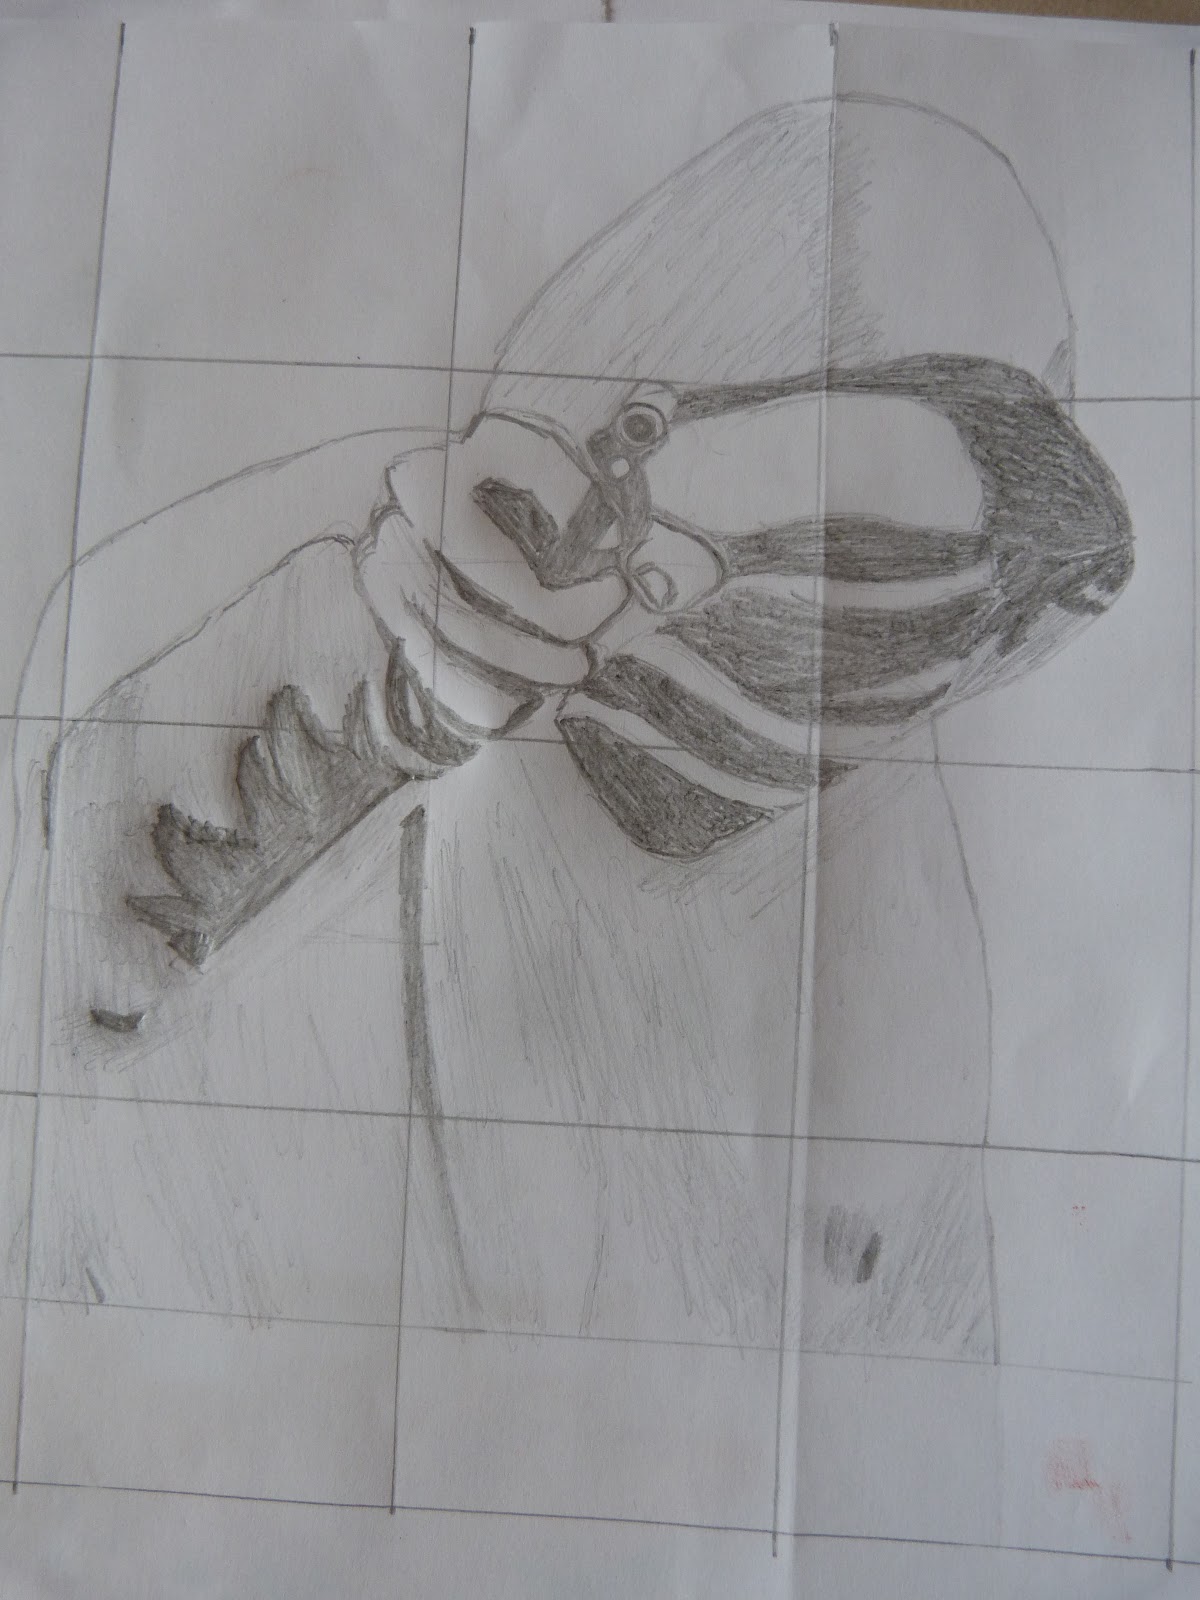
One of the students, Michael, has fantastic drawing skills and has drawn two images directly onto the background. Things are beginning to really come together now. Soon it will be time to add the text to the background.


Weeks 10 and 11
This week we concentrated on finishing the script for the book, everyone took a scene each, wrote it up and then passed it to me for editing. The standard was amazing! For the rest of sessions 10 & 11 we concentrated on finishing the art work and putting the finished script into the book. Here is the stencil created from last week. These will be cut and pasted into the book.

Here is a drawing that will appear on page 1 of one of the books, this has been drawn free hand by one of the students who was confident with drawing.

Here is a painting of a tube station scene.

Once the paint had dried we began to add the text. This was done by printing onto Lazertran paper and then ironing the text directly onto the fabric. Once this was done I took all the fabric pages home and began to sew them all together.

Week 12
Here is a look at the finished product, but don't worry if yours looks different, we are all unique and our artwork is too!

No comments:
Post a Comment